Different Pictures of Pumpkin Carving
Every editorial product is independently selected, though we may be compensated or receive an affiliate commission if you buy something through our links. Ratings and prices are accurate and items are in stock as of time of publication.
No matter how you cut it, these methods for how to carve a pumpkin this Halloween are easy-peasy.
ⓘ
There's a reason why jack-o'-lanterns are a Halloween favorite. Pumpkin carving is a creative activity that can keep kids of all ages entertained, plus it's a fun way to decorate your home for the spooky season! To help get you started, we're sharing ideas for easy pumpkin carving including stenciling, drilling and cutting jack-o'-lanterns, plus the best tips for how to carve a pumpkin.
Don't feel like carving this year? Here are some painted pumpkin ideas you can make instead.
Basic Steps for Carving a Pumpkin
What You'll Need:
- Pumpkin
- Damp cloth
- Pen or pencil
- Pumpkin carving tool set, or
- Paring knife
- Flat-edged ice cream scoop or scraper scoop
No matter which pumpkin carving method you choose, these steps will perfectly prepare the pumpkins. Read up on these pumpkin carving tips from the pros, too.
Step 1: Choose a pumpkin that is an appropriate size and shape for the design you plan to carve. Tall pumpkins may lend themselves better to faces. For designs with lots of cutouts, go for large, round pumpkins with smooth surfaces. And you always want to look for a pumpkin with a flat bottom that will sit upright. Here are some more tips for picking out the perfect pumpkin.
Step 2:Wipe the pumpkin clean with a soft damp cloth and dry.
Step 3:
For a lid: Draw a circle for the lid with a V-shaped notch at the back. This notch will serve as a guide to replace the lid.
For a bottom: Draw an opening on the bottom of your pumpkin if you want to place it over a candle. Be sure to draw the opening large enough so that it will be easy to reach inside and scoop out the contents when cut.
Step 4: This step is for the adults! Cut along the drawn lines for the lid or bottom opening with a sharp paring knife. If cutting a lid, angle the blade toward the center of the pumpkin to create a ledge that supports the lid. If cutting a bottom, cut straight into the pumpkin.
Step 5: Scoop out the seeds and strings from inside the pumpkin. Use a large spoon or ice cream scoop or the plastic scraper scoop that is made for this purpose.
Editor's Tip: Don't toss those seeds! Learn how to make roasted pumpkin seeds, October's favorite snack.
Step 6: Scrape the inner pulp away from the area of the pumpkin that you plan to carve until the pumpkin wall is approximately 1 inch thick.
Have a bin of cookie cutters that don't get used often enough? Put them to good use this Halloween! By the way, this is why we carve pumpkins for Halloween.
 Taste of Home
What You'll Need:
- Cookie cutters
- Hammer or rubber mallet
- Needle-nose pliers (optional)
- Serrated knife
- Candle
- Petroleum jelly (optional)
Before you begin, carefully cut a circle around the pumpkin stem, lift off the lid and remove the seeds from the lid and inside the pumpkin.
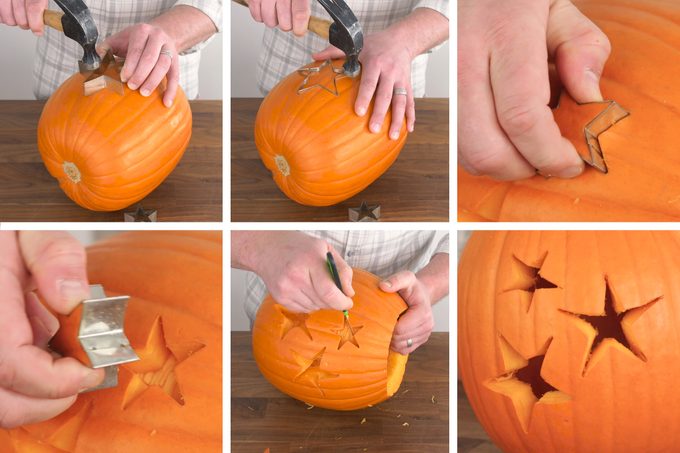
Step 1: Place a cookie cutter on the pumpkin and tap firmly with a hammer until at least half of the cutter has pierced the pumpkin's shell. (If the pumpkin shell is thin, the cutter may be pounded all the way through the shell.)
Step 2:Remove the cookie cutter, using needle-nose pliers if needed.
Step 3:With a small serrated knife (or the serrated saw from a pumpkin carving kit), follow the pattern made from the cookie cutter to cut out the image, making sure to cut all the way through the shell.
Step 4:With one hand inside the pumpkin, push out cookie cutter image from the pumpkin and discard.
Step 5:Place a candle inside the pumpkin and secure it to the bottom with hot wax.
Editor's Tip: Rub all cut pumpkin edges with petroleum jelly to keep it fresh longer. Make sure your pumpkin lasts all season long with these other ways to preserve a pumpkin.
Method 2: Stenciling a Pumpkin
 Christopher Kimmel/Getty Images
For this method, you can use a stencil from a kit or can print out your own outline. We've rounded up a ton of pumpkin carving stencils you can print out for free!
What You'll Need:
- Stencils
- Tape
- Pushpins
- Pen or pencil
- Small paring knife
- Candle
Before starting, cut a lid or hole in the bottom of the pumpkin and remove the pumpkin seeds.
Step 1: Decide which patterns you want to use and print them out to the right size for your pumpkin.
Step 2: Tape the patterns to the pumpkin.
Step 3: To transfer the patterns to the pumpkin, use a pushpin, corsage pin or the tip of the poker tool to poke holes through the paper and into the pumpkin along the design lines, about 1/16 inch to 1/8 inch apart. Make sure all of the lines have been transferred. Remove paper and use a pen or dull-point pencil to connect the dots. Save the paper patterns to refer to while carving.
Step 4: Keeping the small paring knife (or pumpkin saw) at a 90-degree angle, carve from dot to dot to cut out the pattern shapes. If an older child wants to help, the saw is much safer than a knife but still requires adult supervision. Push the cut pieces into the pumpkin with your fingers. If a large piece becomes wedged, cut it into smaller pieces.
Step 5: If you happen to cut through a pumpkin section by mistake, reattach the pieces with straight pins or toothpicks.
Step 6: Insert a short column candle, votive or battery-operated light in the pumpkin. If the candle is not in a holder, form a holder from aluminum foil and secure the candle with a few drops of melted wax.
Editor's Tip: If candle smoke blackens the lid, cut a chimney hole in the lid to vent the smoke and preserve your design. Stenciled pumpkins always look fun by the front door, alongside these fall porch decorations.
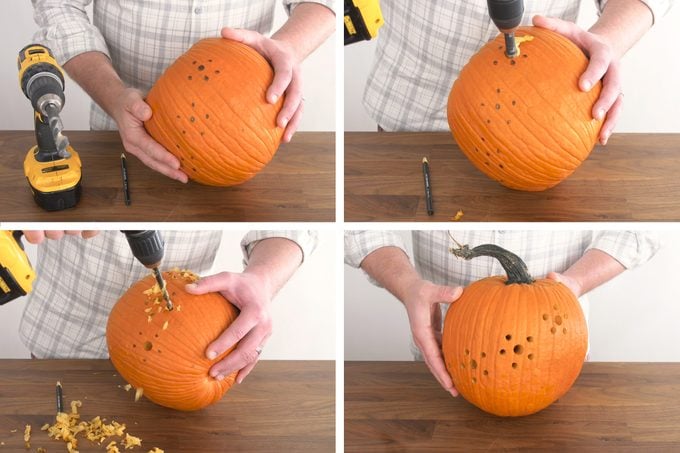
Method 3: Carving a Pumpkin with a Drill
For patterns like a starry night or polka dots, it's helpful to use some heavy-duty tools. An electric drill will make quick work of these designs. For more inspiration, check out this pumpkin decorating kit.
 Taste of Home
What You'll Need:
- Stencil (optional)
- Electric drill
- Candle
Like with the other carving techniques, cut a top or hole in the bottom of the pumpkin and remove the pumpkin guts before starting to carve.
Step 1: Create a dot design using a template or straight edge, or just wing it.
Step 2: Drill dot holes with an electric drill or carefully cut out the design with a knife.
Step 3: Place a candle inside the pumpkin and watch the light shine through newly formed holes.
Next, take a look at things you can do with a pumpkin after Halloween.
Different Pictures of Pumpkin Carving
Source: https://www.tasteofhome.com/article/how-to-carve-a-pumpkin/